An activity from Dave Mastie (Ann Arbor, MI)
Type of Lesson: Demonstration/Discussion
Time Needed: 20 minutes
Physical Science, Grades K-4: Light travels in a straight line until it strikes an object. Light can be reflected by a mirror, refracted by a lens, or absorbed by the object.
Physical Science, Grades 5-8: Light interacts with matter by transmission (including refraction), absorption, or scattering (including reflection). To see an object, light from the object-emitted by or scattered from it-must be enter the eye.
Physical Science, Grades 5-8: The sun is a major source of energy for changes on the earth’s surface…The sun’s energy arrives as light with a range of wavelengths, consisting of visible light, infrared, and ultraviolet radiation.
2. Tape the pieces of paper in place with masking tape so they won't move.
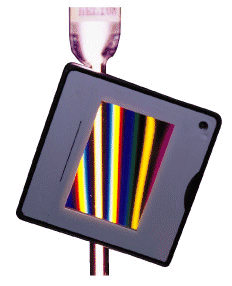
3. Now tape the holographic diffraction grating on the upper, outward facing lens of the projector (curved lens on arm of projector, but not the lens that points down).
4. Now turn on the projector and you should see a spectrum of colors displayed on the wall or screen or wherever the projector is pointing.
B. Separating/Displaying the Spectrum
(see image that will help in the building of the stack of blocks)
1. Normal paraffin wax should come with 4 blocks in it. Take one of the full blocks of paraffin wax and create an imprint with it on a single sheet of aluminum foil. Use the scissors to cut out this imprinted portion of aluminum foil. Now cut 8 more pieces this size. Place to the side.
2. Now, using the knife cut the 4 wax blocks at the halfway point creating 8 blocks that are approximately 2 1/4 inch x 4 1/2 inch x 1/2 inch thick. You may want to just score the blocks at the halfway point, then just break the blocks using the edge of a desk or table.
3. Fold your aluminum foil pieces in half (dull side in). They should now be the same size of the wax blocks you have cut in half.
4. Place wax blocks and aluminum foil in a stack. Start with an aluminum piece on bottom, then a block, then aluminum foil, then a block, then aluminum foil...until the last wax block is added to the top of stack, topping with an aluminum foil piece. The wax blocks should be stacked so that the "front" of the stack has all smooth faces. It doesn't matter if the back of the stack has some blocks with rough surfaces (from the cutting or breaking of the blocks).
5. Now use the masking tape to secure the block stack together. For extra security, place rubber bands on top of tape. (You want to leave the smooth side facing front without tape or rubber bands on it).
6. Now hold the block stack in front of your projector. You'll want to hold the block stack about 2 feet from the projector. The spectrum of colors should "get caught" in the block stack with each block lighting up a different color! This sure will be a surprise for students and yourself!
Paraffin wax can be found at craft or kitchen stores. The sales people may not know it is called paraffin wax, but they are sure to recognize gulf wax or canning wax (it's all the same stuff!).
The holographic grating is a good alternative to prisms which can be finicky in experiments and demonstrations.
Use this demonstration with younger students having them draw and label the block stack with the colors in it. Use this demonstration to start a discussion with older students with regards to the spectrum, wavelengths, diffraction and how the colors are being trapped in each wax block by the reflecting aluminum foil.
This is a good lifelong teaching tool - once you build the wax block stack, it can be used for many years to come!