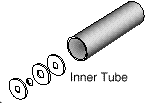
 complete, lay the fine sandpaper on a
flat surface and gradually sand the
edges of each lens completed
mounting assembly to make
them smooth. Stop
sanding when the
assemblies are
just larger
than the
inside
diameter of the corresponding tube.
With a small amount of effort, the
assembly will compress slightly and slip
inside the tube. (Do not insert them
yet.) Friction will hold them in place. If
the lens assemblies get too loose, they
can be held firmly with glue or tape.
complete, lay the fine sandpaper on a
flat surface and gradually sand the
edges of each lens completed
mounting assembly to make
them smooth. Stop
sanding when the
assemblies are
just larger
than the
inside
diameter of the corresponding tube.
With a small amount of effort, the
assembly will compress slightly and slip
inside the tube. (Do not insert them
yet.) Friction will hold them in place. If
the lens assemblies get too loose, they
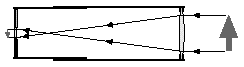
can be held firmly with glue or tape.9. Hold the two lens assemblies up and look through the lenses. Adjust their distances apart and the distance to your eye until an image comes into focus. Look at how far the two lenses are from each other. Cut a segment from the outside and the inside tube that together equal 1 1/2 times the distance you just determined when holding up the lenses. Use the sandpaper to smooth any rough edges on the tubes after cutting.
10. Carefully, so as not to smudge the lenses, insert the objective lens assembly into one end of the outside tube and the eyepiece lens assembly into the end of the inside tube. Slip the inside tube into the outside tube so that the lenses are at opposite ends. Look through the eyepiece towards some distant object and slide the small tube in and out of the large tube until the image comes into focus.
11. (Optional) Decorate the outside tube with marker pens or glue a picture to it.
Discussion:
You just constructed a type of telescope known as a refractor. Refractor means that light passing through the objective lens is bent (refracted) before reaching the
This refraction inverts the image. To have
an upright image, an additional correcting
lens or prism is placed in the optical path.
Astronomers rarely care if images are right-side-
up or up-side-down. A star looks the
same regardless of orientation. However,
correcting images requires the use of extra
optics that diminish the amount of light
collected. Astronomers would rather have
bright, clear images than right-side-up
images. Furthermore, images can be
corrected by inverting and reversing
photographic negatives or correcting the
image in a computer.
Notes About Lenses and Tubes:
Refer to the Lenses and Mirrors activity for information on how to obtain suitable lenses for this activity. PVC plumbing pipes can be used for the telescoping tubes. Purchase tube cutoffs of different diameters at a hardware store.
For Further Research:
- If the focal lengths of the two lenses used for the telescope are known, calculate the power of the telescope. Magnification equals the focal lens of the objective lens divided by the focal length of the eyepiece. Refer to the Light Gathering Power activity on page 56 for more details.
- Bring commercially-made telescopes, spyglasses, and binoculars into the classroom. Compare magnification, resolution, and light gathering power to that of the telescope made here. Learn how these optical instruments function.
- Invite local amateur astronomy clubs to host "star parties" for your students.