
Magnetic Levitation Activity
Student Worksheet for Basic Version of the Activity
DIRECTIONS:
Part 1
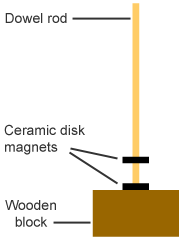
- Place the end of the dowel rod into the hole in the block of wood to create a stand with the dowel mounted vertically.
- Place two disc magnets on the dowel rod (with the rod through the holes in the middle of the magnets). Do the magnets stick together, or does the top one "levitate" above the bottom one? What can you say about which poles of your magnets are towards each other? If your magnets are stuck together, slide the top one off, flip it over, and put it back on. It should now "levitate" above the other magnet (see Figure 1).
- Describe the forces on the top magnet. (Hints: Is something pulling it down? What? Is something pushing it up?)
- Predict what will happen if you press the top magnet down onto the bottom magnet, then quickly release it. Then do it and describe what happens.
- Closely observe how far apart the two magnets are.
 |
 |
 |
Figure 1 |
Figure 2 |
Figure 3 |
Part 2
- Remove both magnets from the dowel rod post.
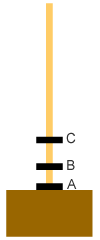
- Put two magnets together so they stick to each other, then slide them over the post and rest them on the base of the stand.
- Place a third magnet onto the post. Orient it so that it levitates above the other two (so it doesn't stick to them). See Figure 2.
- Compare the setup in Part 1 (Figure 1) with your current setup
(Figure 2).
- Is the top magnet closer to, farther from, or the same distance away from the magnet below it as compared to the setup in Part 1? Why?
- What is pushing the top magnet up? What is pulling it down?
- Can two magnets work together to create a stronger magnetic force than one magnet would?
- Remove all three magnets from the post.
- Slip one magnet onto the post, resting on the wooden base.
- Put two magnets together so they stick to each other. Slide the two magnets onto the post. Orient them so they levitate above the bottom magnet (Figure 3).
- Compare this setup with the Figure 2 setup.
- Is the gap between the levitating magnet(s) and the magnet(s) on the base larger, smaller, or the same size as the gap in the Figure 2 setup? Why?
- How does the gap compare to the Figure 1 setup?
- What is pushing the top magnets up? What is pulling them down?
- Is the magnetic force that holds the top magnets up the same as, or different from, the magnetic force in the Figure 2 setup?
- "Weight" is the word we use to describe the force of gravity that pulls on some mass. Compare the mass that is levitated in your current setup with the mass that is levitated in the Figure 2 setup. Which mass is larger? How much gravity force, or weight, is there in each setup?
Part 3
- Remove all three magnets from the post.
- Slip a single magnet onto the post so that it rests on the base. Add a second magnet, oriented so it levitates, as shown in Figure 1.
- Add a third magnet, oriented so it levitates above the second (Figure 4).
- How does the distance between the bottom two magnets (magnets "A" and "B" in Figure 4) compare with the distance between the two magnets in the first setup (Figure 1)?
- How does the distance between the bottom two magnets ("A" and "B") compare with the distance between the top two magnets ("B" and "C" in Figure 4)? What forces are acting on magnet B? magnet C?
- Is magnet A pushing or pulling on magnet C?
- Lift magnet C off the top of the post, but be careful to keep it oriented the same way. Lift magnet B off the post and set it aside. Replace magnet C on the post, keeping the same orientation that it had before. What happens? What can you say about the orientations of the North and South poles of each of magnets A, B, and C?
|
 |
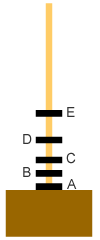 |
Figure 1 |
Figure 4 |
Figure 5 |
Part 4
- Add two more magnets to the three already on the post. Orient the two new magnets so each levitates above those below it, as shown in Figure 5.
- How does the distance between magnets A & B compare to the distance between magnets D & E? Explain the difference. What forces are acting on magnet E? on magnet B?
- Next, examine how well the magnets bounce, or "oscillate", with different setups.
- Build the two magnet setup shown in Figure 1. "Bounce" the magnet as you did in step 4 in Part 1. Bounce the magnet a few times, noting how high it bounces and how long the bouncing continues.
- Now set up three magnets as shown in Figure 4. Try bouncing the magnet stack. Note how high the top magnet bounces, and how long the bouncing continues.
- Set up five magnets as shown in Figure 5 and bounce the stack. Observe the bounce height of the top magnet and the duration of the bouncing.
Last modified March 16, 2005 by Randy Russell.
The source of this material is Windows to the Universe, at http://windows2universe.org/ from the National Earth Science Teachers Association (NESTA). The Website was developed in part with the support of UCAR and NCAR, where it resided from 2000 - 2010. © 2010 National Earth Science Teachers Association. Windows to the Universe® is a registered trademark of NESTA. All Rights Reserved. Site policies and disclaimer.